igrmaharashtra.gov.in NGDRS iSarita 2.0 IGR e-Filing : Maharashtra Registration & Stamps
Organisation : Department of Registration & Stamps, Government of Maharashtra
Facility Name : IGR e-Filing Application
Applicable State : Maharashtra
Website : http://igrmaharashtra.gov.in/
| Want to comment on this post? Go to bottom of this page. |
|---|
IGR Maharashtra e-Filing
Now you can file your Notice of Intimation online without going to Sub Registrar office. The facility is available at igrmaharashtara>Online Services>eFiling (For Citizens) live for the across the Maharashtra.

How To File Online?
** Open the application URL (115.124.105.219/NGDRS_MH/) to access the login page
** Click on ‘Register’ to create new citizen useraccount
Citizen Registration
** Click on ‘Register’ to create new citizen useraccount
** Select type from the dropdown box as citizen.
** Enter Authorized Person Name in Registration form.
** Enter Contact Person Address details in the form.
** Enter contact person ID details in the form.
** Enter Username, Password, Confirm Password, CAPTCHA code.
** In case you forgot your password add hint question and its answer.
** Click on Submit button to create citizen user account.
** Click on cancel to cancel Citizen Registration
** Now go to Citizen Login to do Document Registration.

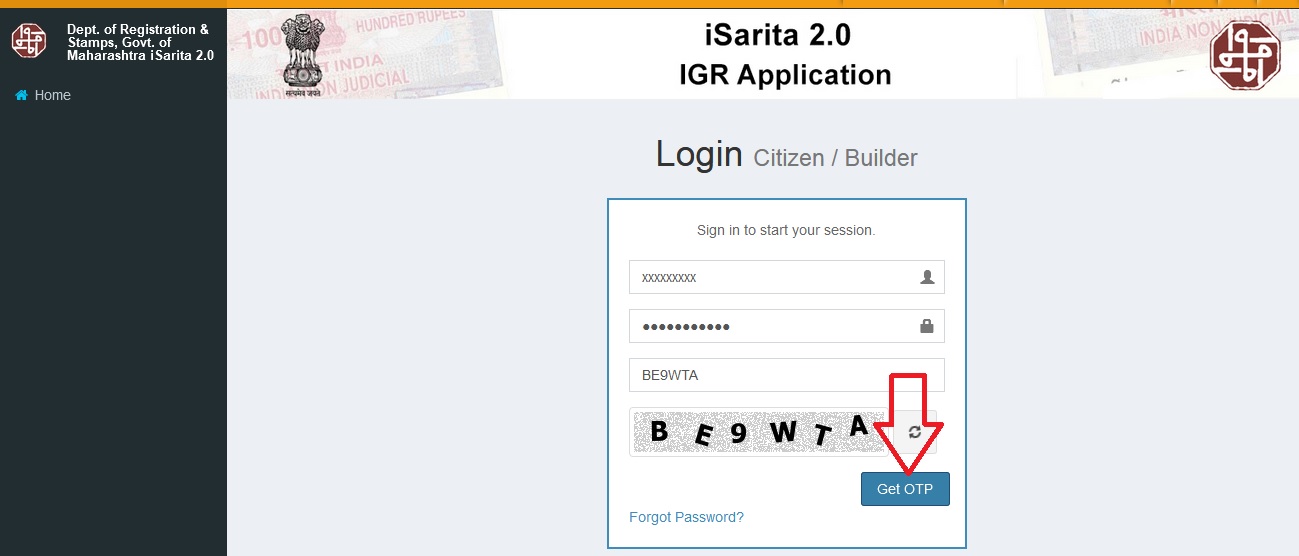
Citizen Login Page
** Click on Citizen Login.
** Enter login username, Enter password.
** Enter CAPTCHA code.
** Click on Login.
** Click on E-Filing menu.
** Then Click on Start E-Filing sub menu.
New E-Filing Entry
** Click on New E-Filing Entry button to start a new E-Filing entry.
** Click on About E-Filing Module button to get information about E-Filing.
E-Filing Entry With No Multiple Jurisdiction:
1.General Info:
** Select Multiple Jurisdiction as NO.
** Click on Start Data Entry Buttonto complete first step
2.Property Details:
** Select District, then select Area Type, select taluka, select local governing body, select city area/ valuation zone, select location and select Level 1 List.
** Enter land area, enter Area of constructed property-Built up area.
** In property attributes, Select property attribute then enter its details accordingly and click on add button to add property attribute.
** In other details enter Property description, pin codeand property address.
** In Documents deposited with bank, select Documents deposited with bank and enter details of document then click on add button to add Documents deposited with bank.
** Click on Save button to save the Property Details.
** If user wants to edit the entry then click on edit button to update the record and click on save.
** If user wants to delete the entry click on Delete button to delete the record.
3.Mortgagee Details:
** Select Bankor NBFCS accordingly.
** In Bank Details select Bank, select Branch Location, select Town, select Taluka, select Village, Enter TAN, enter MICR No.
** In Details of the Branch where documents have been deposited, select At the above Branch? As Yes or No.
** If No then enter Branch Name, select Town, select Village/ Area/ Location
** In Loan details, enter Loan Amount and enter Interest Rate.
** Click on Save to save Mortgagee Details
** Click on cancel to cancel the entry.
4.Mortgagor
** Select Is Executor? Yes Or No, Select Salutation, Enter Party First Name, Last Name as they are mandatory fields.
** Enter Date of birth, Select Identification Type ID and its description.
** Enter PAN no, Select Occupation, select Gender, enter Email ID, Mobile no and email ID.
** Select State, District, Taluka and Village respectively.
** Select UID consent as Yes or No.
** In Detail Address enter all address details accordingly.
** Click on Save to save Mortgagor party.
** Click on cancel to canceling data entry.
** After saving the party, you can edit the party by clicking on Edit button.
** If user wants to delete the entry click on Delete button to delete the record
Set Party as Presenter:
** Click on Set as Presenter button to set party as Presenter at the actual time of presenting the document at SRO office.
5.Stamp Duty
** Click on calculate and save button to calculate Stamp Duty.
** Click on Save and Next to proceed
6.Payment
** Click on select payment mode.
** In How to Pay Box you can can go to GRAS payment page for paying Stamp Duty and Registration fees.
** Enter Respective details according to your payment mode. In below screen Payment is done through E-Challan(GRAS) mode.
** Click on Save button to save payment details.
** Click on Reset button to reset the entry.
** Click on New Entry button to do new entry of payment.
** Click on delete button in table to delete the payment entry
Gras Payment Site:
Do payment related to Registration and Stamp Duty.
7.Party Execution
** Click on photo capture button to capture photo.
** Click on Fingerprint Capture button to capture fingerprint.
** Click on Reset button to clear Photo and biometric entry
8.eKYC
** Click on eKYC button
** Click on Biometric Or OTP
** Enter UID no or Mobile No according to selection.
** Click on Yes to save EKYS verification
9.Show Notice
Click on Download PDF linkto download Notice.
10.Bank Approval
** Click on Is Notice Authenticated By Bank as YES or NO
** Enter Date Of Approval.
** Enter Approved By details.
** Enter Remark
** Click on Save to save bank approval details
11.Upload Document
** Select file by clicking on Choose File button.
** Click on Upload /Update button after selection of the file.
** Click on Download link to download the uploaded document
12.Submit Data
** Click on all checkboxes.
** Click on Submit notice button to do Final Submission.
After Registration Completion:
After Registration Completion citizen will be able to Download Notice, Payment Receipt and Index 2 Report Data Entry Home Page.
i have submitted the file..but why i am not able to see receipt and index II